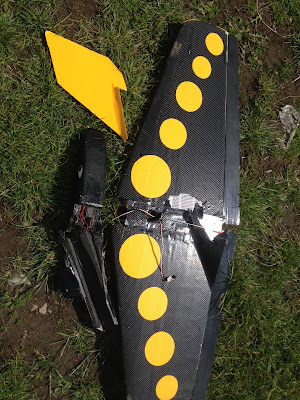
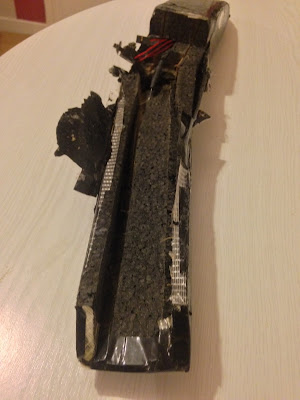
Unfortunately, it came a cropper when I was teaching my girlfriend to fly, and I had her on a trainer lead but when I flicked the switch, (yes it was the correct switch) to take back control, I had no control, and the Thing plummeted vertically to earth.
So I began by stripping the packing and GF tape covering from the fuselage so that I could see the true extent of the damage, and yes, the fuse had broken into two pieces.
The piece on the right had also split for about half its length, so I've glued that back together.
I've ordered some UHU POR to join the two halves together as it is naturally elastic in nature once it has set. So once that has arrived I will use wooden cocktail sticks pushed into both halves of the foam to re-enforce the join before gluing them together.
So as I couldn't do anything else to the fuse, I stripped the vinyl covering off the wing but left on the GF tape. My plan is to cover the wing in Easycover, a cheap iron on film, then cover this with 42 micron, (really thin) laminate film. This will provide stiffness and protection for the covering but with minimal weight increase.
So this evenings job is to remove the elevons from the wing and strip the black packing tape from them. The GF tape hinging is showing signs of degradation so I want to renew this.
I have some black HK iron on film which I will apply to the underside of the wing once I have re-attached the elevons, then I just have to wait until I've taken delivery of the yellow Easycover before I can continue.
-------------------------------------------------------------------------------------------------------------------------
There wasn't a great deal I could do this evening, but I have learned something new.I closely inspected the wing and the GF tape was quite well wrinkled and there were lots of little dents and dings in the foam. This wasn't going to make covering with shrink film particularly easy or attractive to look at. This may only be a foamie model, but I am taking pride in rebuilding it and what it will look like. There's nothing better than receiving compliments from fellow modellers over the quality of a build.
I began by removing the elevons and the packing tape I'd covered them with.
I then turned my attention to the wing and wondered what effect adding heat would make, running a covering iron over the GF tape? I had used the iron on the Polecat and saw that the heat helped to remove creases in the foam.
I tried various temperatures beginning at 100*c but found that 120*c seemed ideal.
As I slowly ran the iron over the tape, I could see the wrinkles in the tape coming out and the tape seemed to become very shiny, as if the adhesive was being activated and sticking it down better to the foam.
By the time I'd gone over the the entire wing, I was very happy with the result and reattached the elevons.
That was all for this evening and I hope to continue tomorrow.
Before
After
--------------------------------------------------------------------------------------------------------------------------
So I haven't been lazy the last few evenings, I have been doing some work on the Thing.
I began using cocktail sticks pushed into the foam in the fuselage where the break in the fuselage was, to help reinforce the join and glued it together using UHU POR.
Once joined, it wasn't a perfect fit so some rubbing down with sandpaper was done before I applied a patch of glass fibre cloth over the break point and gave it five coats of Poly C.
This was then rubbed down until smooth before covering in 75 micron laminate film.
Then finally I covered the whole thing in iron on shrink film.
I will probably add a layer of the very thin 42 micron laminate film, just along the bottom to protect the black film on landings.
-------------------------------------------------------------------------------------------------------------------------
This evening I have been covering the wings. But first I had to do a soldering job.
-------------------------------------------------------------------------------------------------------------------------
This evening I have been covering the wings. But first I had to do a soldering job.
In the crash, the servo connectors going into the receiver were broken, so I found a couple of old servo extension leads, cut the wires and spliced them onto the existing servo leads.
This proved to be more difficult than I anticipated as my soldering iron decided it didn't want to work properly. I think the thermostat has gone. So I'll be down to Maplins on Saturday to buy a new one.
So back to the covering.
The underside was done in Hobby King iron on shrink film, which I already had, and the top was done in Easycover shrink film.
The HK film seems thicker and able to take higher temperatures. The yellow Easycover went on fine but you could see the GF tape underneath through it.
But this is a cheap foamie model and I wasn't about to use something expensive, such as Oracover on it. This'll do for my purposes.
So now I just have the fin to recover, fit the electrics and connect the elevons to the servos and add a little wing decoration and I'm all done. So it should be ready to fly next weekend.
--------------------------------------------------------------------------------------------------------------------------
So I've added the decoration to the wings and I was going to leave it at that. However, the covering will take some abuse during landings on rough terrain so I've decided to cover the wing and fuselage in 42 micron laminate film.
This is very thin and very light. I added a strip to the underside of the Polecat fuselage and you really can't see that it's there. But it will add some protection and help to stiffen the wing also.
So this is the top side before the lam film goes on.
And the underside.
--------------------------------------------------------------------------------------------------------------------------
So this evenings first task was to cover the correx fin.
My plan was to cover it with shrink film, however, I had no idea what the melting point of correx might be. So, I covered it first with glass fibre tape, in the hope that would protect it somewhat.
The tape went on as usual and then I decided to try the iron on it at 120°c, as I had done on the wing.
This really does wonders for this tape, really sticking it down well and it makes it very smooth.
Then it was just a case of adding the heat shrink film on top, again at 120°c, which turned out fine.
In the crash, I lost one of the elevon control rods but I couldn't find anything suitable in my box of bits, so I attached the one I had then refitted the receiver, battery pack, switch and balance weight.
I shall have to nip out to my local hobby shop on Saturday to get myself the correct thickness of control rod. Then I can attach the wing to the fuselage and add a couple of little pieces of trim decoration and then the job is a good un!
--------------------------------------------------------------------------------------------------------------------------
This evening I've completed as much as I can do, and that was to just add some extra decoration to the fin and to the centre section of the wing.
--------------------------------------------------------------------------------------------------------------------------
This evening I've completed as much as I can do, and that was to just add some extra decoration to the fin and to the centre section of the wing.
That's the first time I've used a spaghetti measurer to draw circles on shrink film.
And here is the almost complete model.
I'm just awaiting some threaded control rods to arrive in tomorrow's post. I can then connect the elevons to the servos and fix the wing to the fuselage.
Hopefully the next time I post with the Wildthing, it will be with a video of it being chucked off a big Welsh hill.
With this rebuild I've tried doing things I haven't done before, and fortunately they all worked very well.
Some things worked particularly well, sandwiching shrink film covering between two layers of laminate film for instance. Using glass fibre tape will probably become a thing of the past for me.
But I've also learned that if gf tape is used, to run a hot iron over it, which sticks it down better and gives it a very smooth finish.
So I can now take what I've learned from this and the Polecat rebuild and use these techniques in my next project in January.
Catch you soon & happy flying.
Steve


Hi Steve
ReplyDeleteThe 42 micron laminate film that you used, is that just ironed on or does it have sticky back, and is it the same as they use for laminating paperwork.
Chris
This comment has been removed by the author.
ReplyDeleteHi Chris
ReplyDeleteThe lam has its own adhesive on one side, which looks frosted and the other side looks clear. You just lay it on and iron it, similar to using Oracover or such like. Although because it doesn't shrink you start in the middle and work your way outwards.
Basically it is the lame stuff as for laminating paper, but the 42 micron is much thinner.
Steve
thanks, interesting blog. Glad you became the guinea pig for trying to stick iron-on film to GF tape. I was mooting on trying this myself. It appears to work! Looks far better than coloured tape.
ReplyDeleteLooks awseome, great job, very inspiring!
ReplyDeleteFantastic work
ReplyDelete