About A470 Soaring


This is the blog for a few guys who spend their time flying radio controlled gliders, or slope soarer's, from the many and varied slopes around SE Wales.

This usually begins at the northern end of Cardiff, driving north up the A470 up to the Heads of the Valley's and the southern fringe of the Brecon Beacons. But the A470 road continues its windy way all the way to N Wales.

There are many slopes available for most wind directions, the most famous being the area between Nant-y-Moel and Treorchi known as The Bwlch, which has some of the best slopes and flying in Europe with many F3F competitions being held there each year and visited by many fliers from Europe and around the world. At 1500 feet (450m) above sea level, there is usually more wind than not, and certainly more than at sea level.

If you require any further information, are new to slope soaring or are visiting the area, please contact Steve at steve.houghton59@gmail.com . I look forward to hearing from you.

Take a look at Page 2 (look below and to the left here) for Google maps of our most popular Flying Sites.


Wednesday, 20 January 2016

More Moth Build continued .............

So on Saturday I only managed to get one job done, and that was to glue the wing into the fuselage.

I had marked the wing during a dry fit to show the position of the fuse and I laid onto the wing, (both top and bottom surfaces), two strips of 1" (25mm) masking tape. This is to stop any glue that should be squeezed out of the fuse from sticking to the wing itself.

The wing was pulled out of the fuse by about ¾" (20mm) and a generous dollop of UHU POR was squeezed onto the wing and spread around, both on the top and the bottom. The wing was then pulled back into the fuse and then out the other side and the process repeated, so there was plenty of glue to stick the wing to the fuse.


--------------------------------------------------------------------------------------------------------------------------

The next job was to take the supplied elevons and create a bevel on the ¼" TE end, for this I used a razor plane and finally a light sanding. The elevons were then cut to length and the tips shaped as per the supplied template before being wrapped in 75 micron laminate film, which really stiffens them up.


The elevons were then attached to the wing using 1" (25mm) X weave tape and then a hot iron used to really stick them down.


Before I glued the wing to the fuselage, I decided it would be a good idea to ensure the servo's actually worked. Really I should have tested the servo's BEFORE I fitted them into the wing. So I found a spare receiver, set up the Moth on my transmitter, and bound the RX to the TX, and fortunately all worked ok. However, when I tried to fit the RX into the electronics compartment, it was too big and wouldn't fit.

I usually use the Hobby King AFHSS Hitec Minima compatible RX in my models as they are really cheap, but I haven't had any problems with these at all. So an alternative had to be found.

I was thinking of using a original Hitec Minima RX, but after posting my issue on the BARCS forum, a alternative product was advised, a Frsky AFHSS Minima compatible unit available from T9 Hobbysport. This isn't a full range unit, but it does have a range of 1000m, so this would be perfectly adequate, after all, this model is designed for fast passes along the slope, so I'll be lucky if it gets 500m away from me.
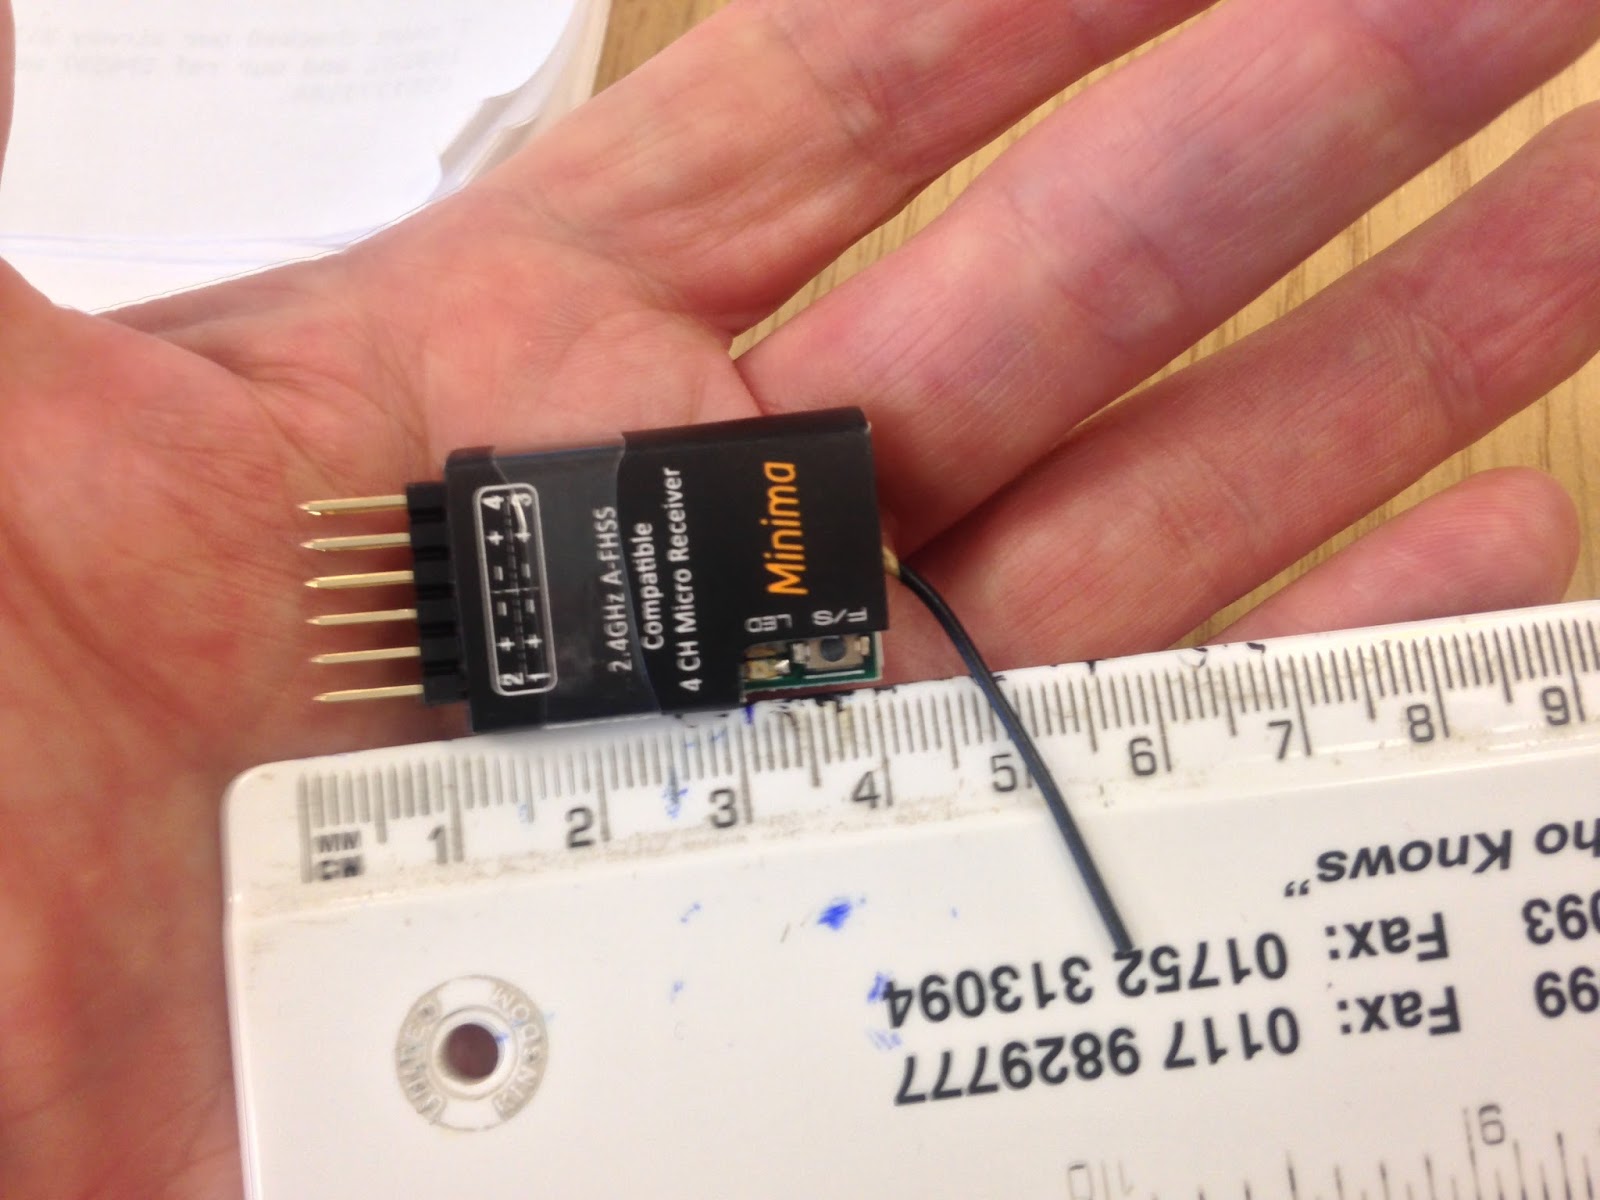


I connected it up to the Moth, bound it to the TX, and it slides into the cavity very nicely.

I have been informed that the stumpy aerial has a habit of coming away from it's connection, but that a small blob of hot melt glue stops that occurring, so I will have to do that.


Monday, 18 January 2016

STUFF!

So I didn't get any flying in over this weekend. Saturday was cold but nice, however there wasn't enough wind to worth making an effort to hit a slope. I'm sure if I had then I'd have just been scratching around for lift. And Sunday began with little wind, misty, which turned to rain, so another non flying day was had.

I got a little bit more done to the Moth build on Saturday but I won't post until there's a bit more to say about it. I may get a little bit done this evening but it's more likely that it will be tomorrow evening now.

Mark made a suggestion a couple of weeks ago about staging a fun, F3F competition style race day, for foamy built models only, as most of us in our flying group have at least one foamy model in the hanger. Although Big Phil felt that his little Spook, (Weasel lookalike) wouldn't be up to the job of racing, so he decided to purchase a Spectre from Flyingwings to race with.


So I guess now we just need to wait for some suitable weather, possibly early spring, as it's a bit chilly at the moment to be standing around for long periods. My Moth and Polecat will be ready and waiting!

Until next time
Happy flying
Steve

Thursday, 14 January 2016

Moth Build still continued ............

So I had a change of plan this evening. I was intending on making up the RC component hatches, but instead I ended up laying down X weave tape onto the centre section of the wing, top and bottom and rubbed the tape down with sand paper to remove the release agent ready for gluing to the fuse. I also added a layer to the LE.


Next up a job I've grown to really enjoy doing, laminating, or NS (new stuff) as some still call it.
There are a lot of people who think that you need to use some kind of spray glue, such as 3m 77 for the lam to stick down properly, but that has never been my experience and this is the 5th model I've laminated and I have never felt the need to use any extra glue to hold down the lam, which sticks down perfectly well by itself.

I do each of the four wing panels separately and cut the lam about 25mm (1") oversize, then I set the iron at 120*c. I begin in the middle of the wing and work outwards, then iron the overlapping bits over the LE and TE. This gives a double layer once you've completed the top and bottom to protect the LE from damage. Once the lam was down I reset the iron to 150*c and went over it again. This tightens it up and removes any wrinkles. If it's been done correctly, it should look like a glass finish.


Wednesday, 13 January 2016

Moth Build continued ....................

So the next job was to cut and sand the wing tips to shape.


Then I had to fit the rear carbon spar. This was achieved by measuring 3" down from the main spar, laying the rear spar on the foam and drawing the outline of the spar onto the foam. I then used a blade to cut the outline and a router type tool to remove the foam. I chose to use Gorilla glue instead of epoxy to glue the spar in place. The instructions say to use epoxy and then use scraps of balsa to fill any gaps, but by using the GG the glue filled any gaps instead.

The next job was to decide where to fit the servo's. The instructions recommend they are mounted up against the main spar, which makes sense! So I marked the foam and routered it out until the servo's, when fitted, were flush with the top surface of the wing.

The servo's were then potted. I mixed up some epoxy and used just enough the cover the walls and bottom of each servo bay. The servo was then placed in a polythene sandwich bag and pushed into the tight fitting bay and left to set. The servo was then taken out, removed from the bag and then I wrapped the servo in masking tape and secured the servo in place with a blob of hot melt glue.


The instructions say to fit the servo's so that the servo arms and control rods lay UNDERNEATH the wing. I have to say I do not like this idea. I guess it's fine if you are landing on a crown bowling green, but very few slopes are that smooth. Most of the UK forum builds I've looked at have put the control rods ABOVE the wing, and that is what I have done. This has meant I have had to take the servo wires over the top of the spar, but they should be ok.

So that is the wing now completed and ready to be mated with the fuselage, which will happen one I have made the RC component bay, which is my next job.


Tuesday, 12 January 2016

Moth Build Continued ..............

So the next job to be done to the wing is to glue the drag spar to the TE of the wing. Glue is left off the centre 2½" so that the drag spar joiner can be fitted once the glue has set on the drag spar. Then the drag spar joiner is laid on top of the foam and the foam marked then cut out, then the drag spar joiner is glued in place.


In the mean time, whilst glue has been setting during the above tasks, I made a start on the fuselage.


The carbon tube longeron supplied is glued into the slot which runs almost the full length of the bottom section. Enough epoxy is supposed to be mixed so that the glue is pushed up the sides of the longeron and then fill the gap above to the fuselage top, totally encasing the longeron in epoxy. However, I'm trying to keep this build light so I only used enough epoxy to glue the longeron in place. It's certainly secure enough!


I then made provision for adding a switch as the hole for this was going to be easier to make before the fuselage top was glued to the bottom section.


Instead of the recommended epoxy, I glued the two halves together using UHU POR, which is more elastic in nature, epoxy is quite brittle and I'd rather there be a little give there. 

In the picture above, you can see there is a slot in the nose where the longeron ends. This slot is filled with a supplied piece of foam dowel and just glued into place.


Once the glue has dried, the shaping of the fuselage can begin by using a blade to shave off 3mm of foam from each corner and then sanding smooth and to shape.


I couldn't resist putting the wing into the fuselage for a cheeky look.


So the next jobs are to shape the wing tips and add the rear wing spar before looking at fitting the servo's. 

I've read on one of the forums that it was recommended to make a ply box to fit the servo's into as over time the foam around a potted servo compresses and makes the servo loose. This is something I haven't experienced before with an EPP model. Usually what I do is wrap the servo in masking tape and use a large blob of hot glue to secure it in position, so that the glue comes up the sides of the servo, the servo then is secure and doesn't move, but also, by using the hot glue, the servo is easily prized out should the need arise.

This is something I shall have to think about, but my instinct is to use my tried and trusted method.

Steve


Wednesday, 6 January 2016

Drones - A further call to arms

I've pinched the following from the Goodwind Slope Soaring blog, but I feel that this has been worded well and so there was no need for me to make much in the way of change.

In case you haven't heard already .......

Ireland's new regulations

American UAS registration 

If similar rulings were to be made in Britain, it would ruin our hobby.

Take action NOW and contact your local MP.

Make it clear that-

The models we fly are not 'drones', they are carefully constructed aircraft that take great skill to fly and build.

They require 'line of sight' visual contact at all times.

The hobby is one that is shared across the generations.

The hobby encourages innovation and the learning of a wide range of practical 'hands on' skills, especially among younger participants.

The hobby encourages many people from different backgrounds to socialise.

The hobby is healthy and environmentally friendly and encourages people to spend time outdoors in locations which, for decades, have hosted model flying events without incident.

With multi-copters (or drones as they are commonly referred to) becoming widely available, the 'off the shelf' technology allows people with no experience to fly straight away. This can often lead to irresponsible behaviour, especially when used in conjunction with the 'on board' cameras that allow beyond 'line of sight' control.

The rulings in Ireland and the USA effectively outlaw the hobby we have enjoyed for decades.

We require their assistance in protecting our position should any rulings similar to those in the USA and Ireland, be proposed in Britain.

Contact the BMFA stating-

Your utmost concern regarding the developments in the USA and Ireland.

You require a clear response as to how the BMFA (as your representative) intends to help block any similar rulings that may be proposed for Britain.

Ask that the proposals for the 'BMFA National Flying Centre' be put on hold until it is clear that the flying freedoms we currently enjoy will be fully protected.

--------------------------------------------------------------------------------------------------------------------------

My own feelings are that something certainly needs to be done regarding drones. I think that the larger, professional drones used in industry, television etc should be registered and the operators properly trained before a licence is issued to the operator and that they should be properly insured, as we are.

Secondly I feel that the smaller, cheaper units purchased by many for leisure use should be restricted in their operating range, possibly a Park Fly type receiver, giving a range of say 100 - 150 metres, this would stop, out of visual range, FPV use, and that all units sold in the UK should have documentation included to state what the British law is relating to the use of drones and that suitable insurance should be obtained. 

If something isn't done NOW, there will be a serious accident, lets not wait for that incident to happen before we make make changes to the law.

Steve


Monday, 4 January 2016

NCFM Moth Build

Well Christmas 2015 is now gone and it's time to get on and build my Christmas present, and the first thing to do was look at the contents of the box.


Then I read the build instructions that came on the provided disc in PDF format. I also looked at a few build blogs I found on line.

The first assembly task was to join the wing halves with 5 minute epoxy, however I didn't have any, so 30 minute epoxy would have to do.

This is done whilst resting on the wing beds, so I taped the two wing bed panels together firstly.


Then, so as to not stick the joined wing to the beds with any epoxy which might drip through, I placed a piece of grease proof paper onto it, glued the two wing halves together and held them together using masking tape, and weighted it down with my sugar jar.


Once the glue had set, I then ran a length of masking tape along each side of spar groove. The two carbon tubes fit into an aluminium tube, which is slightly wider than the groove and the foam has to be marked and cut to allow this to fit.


There will be a gap at the end of each wing, and so foam from the wing bed has to be cut out to fit the spar slot and glued in place. I used UHU POR for this.


I then ran Gorilla Glue along the whole length of the spar grove and fitted the spar. I then covered this with more grease proof paper and weighted the spar down with tins of baked beans, tomatoes and whatever else I had in the kitchen cupboard and left it to dry overnight.

Upon inspection this morning, the Gorilla Glue had seeped through the foam and slightly stuck it to my building board, but this was easily prized off.

I only used a small drizzle of glue as it expands into a foam, but only a little of it had come up the sides of the carbon spar tube.

This evening I poured epoxy over the top of the carbon spar tubes and fitted the balsa spar cap filler strips.